Today we’re going to take a look at Google’s App Inventor feature that offers programming-novices a nice possibility to enter the fabulous world of Android App programming without deeper knowledge of the API or complex SDK installations.
So lets build some stuff ..
Prerequisites
-
A Google App Inventor Beta Account – request one here
What we are going to build
-
We are building a simple GUI with a Textbox and a button
-
A click on the button starts an event that queries the acceleration sensor for coordinates
-
If the sensor is active and enabled then the coordinates are displayed in the text box
Project and GUI
-
Log into the App Inventor homepage and create a new project – I named this one “testproject“
-
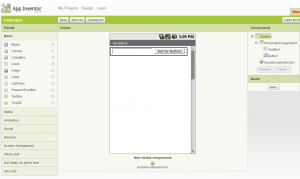
We want the textbox and the button to be arranged side-by-side so we’re using a Horizontal Arrangement – click on Screen Arrangement and drag Horizonzal Arrangement to the Android screen
-
Now click on Basic and drag a TextBox and a Button onto the Horizontal Arrangement
-
We’re going to need the acceleration sensor so click on Sensors and drag a Accelerometer Sensor onto the screen
-
That is all we need for now in our GUI so save your project – we are going to add some logic now ..
-
That’s what my screen looks like

Control Logic
-
The Android Blocks editor is started via Java Web Start – simply click on “Open the Blocks Editor” and run the application
-
In the first step we want to handle a click event on the button so click on My Blocks, click on YourButtonName and select the “when Button.Click do” Element
-
Before we do anything with the accelerometer sensor we want to test if the sensor is available, so click on Built-In > Controls and drag the “if test then-do” Element to the first element we have created
-
Now to add the if-condition goto My Blocks > AccelerometerSensorName and drag the AccelerometerSensor.Available Element to the preceding test node
-
Now we’re going to define the action that takes place if the button is clicked and the sensor is available – to get some coordinates and display them in the text box – at first drag the My Blocks > TextBoxName > TextBox.Text element onto the if-then element
-
We want to create a string that displays the coordinates like this example: “x: 134.44 y: -44.54 z: 22.36” so we’re going to need string functions which can be found under Build-In > Text – select the “make text” element here and drag it onto the preceding element
-
Select from the text functions a text element, click on its label, change it to “x: ” and drag the element to the first position of the make text element
-
Go to My Blocks > AccelerometerSensorName and drag the AccelerometerSensor.XAccel element to the second position of the make text element
-
Repeat the last two steps for the y and z-coordinates and return to the App Inventor Website – do not close the block editor yet because the next step requires a running instance..
-
Here is a screenshot of my result

Deploy and run
-
There are three possibilities to deploy your application: To generate a QR code to download the app in your smartphone, to download the generated apk-file in your browser or to directly install the application via USB.
-
If your usb connection works with the App Inventor you’ll probably want to use this possibility
-
Now run your application and enjoy :D
Conclusion
Google’s App Inventor enables you to create simple applications in a short time without deeper knowledge of the Android API so perhaps this creates an entry point for interested app developers. On the other side there are only a few features of the rich Android API supported yet but of course – it’s a beta version. I still hope that Google is going to put some of this work back into the SDK and especially into the “GUI builder” for my Eclipse IDE ;)
If you want to see how this application is achieved using the SDK .. take a look at the article Sensor Fun: Using the accelerometer on Android
Watch the inventor in action on YouTube.
Resources
Article Updates
-
2018-06-01: Embedded YouTube video removed (GDPR/DSGVO).
-
2015-03-03: Table of contents and image captions added.